You can do a passable bird call today, in your first session, without any gear. The trick is picking the right call to start with, breaking it into its smallest parts, and running a short drill that locks in the pitch, rhythm, and timing before you try to string it all together. Here is [exactly how to make bird chirping noises](/identify-bird-songs/how-to-make-bird-chirping-noises). how to do different bird calls
How to Do an Easy Bird Call: Step-by-Step Practice

Marcus Hendricks
23 Mar 2026
Pick an easy bird call type to learn first
Not all bird calls are equal in difficulty. Some are buzzy, scratchy, or rapid-fire trills that even experienced birders take months to nail. For your first attempt, you want a clear, pure whistle with as few notes as possible and a consistent rhythm you can repeat exactly the same way every time.
The black-capped chickadee is the gold-standard beginner call for exactly this reason. Its song is a simple two-note whistle often described as 'fee-bee' or remembered as 'cheeseburger.' The first note is higher in pitch than the second, the pause between them is steady, and the whole thing takes less than a second. That consistency is what makes it so learnable: you are matching one interval, one pause, and one drop in pitch. There is almost nothing to get wrong once you hear the pattern.
When you are ready to move beyond the chickadee, the same logic applies: look for calls described as clear whistles rather than harsh, scratchy, or liquid tones. A clear whistle gives your mouth a specific target pitch you can hold and adjust. Harsh or buzzy calls involve throat and lip textures that take much longer to develop. Start simple, get that win, then progress.
What gear you need (or don't need)
Honest answer: you do not need any gear to start. Your mouth, a quiet space, and access to a reliable audio recording of the call you are learning are enough for your first several practice sessions. A phone with a free app like Merlin (Cornell Lab) gives you high-quality recordings of nearly any common bird, and that is all the audio source you need.
Where gear actually helps is in self-assessment. The single most useful thing you can add is the ability to record yourself. Your phone's voice memo app is fine. When you record your attempt and play it back immediately after hearing the original, you stop guessing whether you matched the pitch and start hearing the actual gap. That feedback loop accelerates everything.
Beyond that, a pair of decent headphones makes a real difference for picking up subtle pitch differences in recordings, especially outdoors where ambient noise competes. Earbuds work. You do not need anything specialized.
How to mimic bird calls by ear step-by-step
How to mimic bird calls by ear step-by-step
This is the core method. Follow these steps in order the first time you try any new call.
- Listen to the call three times in a row without attempting to imitate it. Just absorb it. Notice whether the pitch goes up, down, or stays flat. Notice where the pauses are and how long they last. Notice whether the call feels fast or slow compared to a normal spoken word.
- Hum the pitch of just the first note. Do not add any mouth shape yet, just match the note with a closed-mouth hum. If you are off, slide your pitch up or down until it clicks. This isolates pitch from everything else.
- Now open your mouth and whistle that first note alone. Hold it for two or three seconds so you can lock it in. Compare it to the recording.
- Whistle the second note alone the same way. For the chickadee, it is lower. Find where your mouth naturally drops to reach that lower pitch.
- Connect both notes with the correct pause between them. The pause is not silence you fill in, it is part of the call's rhythm. Listen again and count the gap: it is short, roughly the length of a quick breath.
- Add the mnemonic out loud while you listen. Mouthing 'fee-bee' as the bird sings it locks the rhythm into muscle memory faster than pitch-matching alone. Say it in sync with the recording two or three times.
- Attempt the full call. Record yourself if you can. Play back your recording immediately after the original. Notice what is different: pitch, pause length, or how the second note falls.
The key principle behind this method is isolation before combination. Beginners who try to nail everything at once usually lock in a slightly wrong version and then practice that wrong version until it feels right. Isolating the first note, then the second, then the connection means you are only combining things you have already verified.
Quick practice routine and drills for beginners
Keep your sessions short. Fifteen minutes of focused repetition is more productive than an hour of vague listening because your ear fatigues and stops discriminating fine differences after a while. Here is a simple daily structure that works for the first two weeks.
- Active listening warm-up (3 minutes): Play your target call on a loop, eyes closed. No imitation yet. Let it become familiar to the point where you can anticipate the second note before it arrives.
- Isolated note drills (4 minutes): Whistle the first note five times, aiming for the same pitch each time. Then whistle the second note five times. Record yourself once per round and check against the original.
- Full call attempts with pause focus (4 minutes): Attempt the full two-note call ten times. Between each attempt, count one slow beat to reset instead of rushing into the next try. Rushing destroys the pause structure.
- Comparison and correction (4 minutes): Play your recording back-to-back with the original. Identify the one thing most off, whether pitch on note one, pitch on note two, or pause length, and repeat that element five more times in isolation.
After about a week of this, you will find the call starts coming automatically without having to think through each part. That is when you know you have internalized it and are ready to move to a slightly more complex call, like a three-note phrase or a call with a short trill at the end.
Common mistakes and how to fix them fast
Most beginners hit the same four or five problems. Knowing them in advance saves you from practicing the wrong thing repeatedly.
| Mistake | What it sounds like | Fix |
|---|---|---|
| Mishearing the starting pitch | Your version is consistently too high or too low overall | Isolate note one alone, hum it first before whistling, compare to recording immediately |
| Collapsing the pause | Your call sounds rushed or slurred into one note | Tap your foot on the pause to make it physical, or count 'one' silently between notes |
| Dropping pitch too far on note two | Second note sounds exaggerated or mournful | Find the correct interval by sliding slowly downward from note one until it matches the recording |
| Breath inconsistency | Volume spikes or fades mid-note | Start each note from a relaxed breath, not a forced push; think steady stream, not burst |
| Rushing the repetition | Each attempt sounds slightly different with no anchor | Fully reset between attempts: short pause, inhale, then start from the same mouth position every time |
The single most common issue is not isolating the phrase before combining it. If your full attempt sounds wrong and you cannot tell exactly why, go back to individual notes. You will almost always find that one of the two notes is slightly off, and fixing that note in isolation fixes the full call immediately.
Improve accuracy: timing, pitch, rhythm, volume
Once your call sounds roughly right, the next level is making it sound exactly right. That means tightening each of these four elements separately.
Timing and rhythm
Rhythm is the element most beginners undervalue. A call with perfect pitch but wrong rhythm sounds like a different bird entirely. Use a spectrogram view (Bird Song Hero or Merlin's waveform display) and look at where the blank spaces fall. The spaces are as important as the notes. If you can pause the spectrogram and count the gap in syllables or beats, you can replicate it precisely. Practice matching the gap before worrying about pitch perfection.
Pitch
Pitch accuracy improves fastest when you compare your recording to the original side-by-side rather than from memory. Memory of pitch drifts quickly. Record one attempt, immediately play the original, then immediately play your attempt. Your ear will catch the difference when the comparison is that close together. If you have access to a spectrogram, the vertical axis literally shows you whether your second note was a half-step or a full step off.
Volume
Most beginners call too loudly when they are nervous and too softly when they are uncertain. Real bird calls have a natural arc: a clean attack, a steady middle, and a smooth release. Practice at a conversational volume first. Getting the shape of the note right at moderate volume is much easier than managing all the variables at full projection.
Moving to harder calls
Once your two-note whistle is consistent enough that someone else could identify the bird from your call alone, add one element of complexity. Try a call with a repeated phrase, a slight pitch rise inside a single note, or a three-note sequence. Bring the same method: isolate each component, lock it in, then combine.
When to use recordings vs live listening
Recordings and live listening serve different purposes in your practice, and mixing them up is a common source of frustration.
Recordings are your primary practice tool at home. They let you loop, pause, slow down (with some apps), and compare your attempts back-to-back with the original. A recording does not get tired, does not change its behavior, and gives you a controlled reference point. Use recordings for your daily drill sessions, especially in the early weeks when you are still locking in pitch and rhythm.
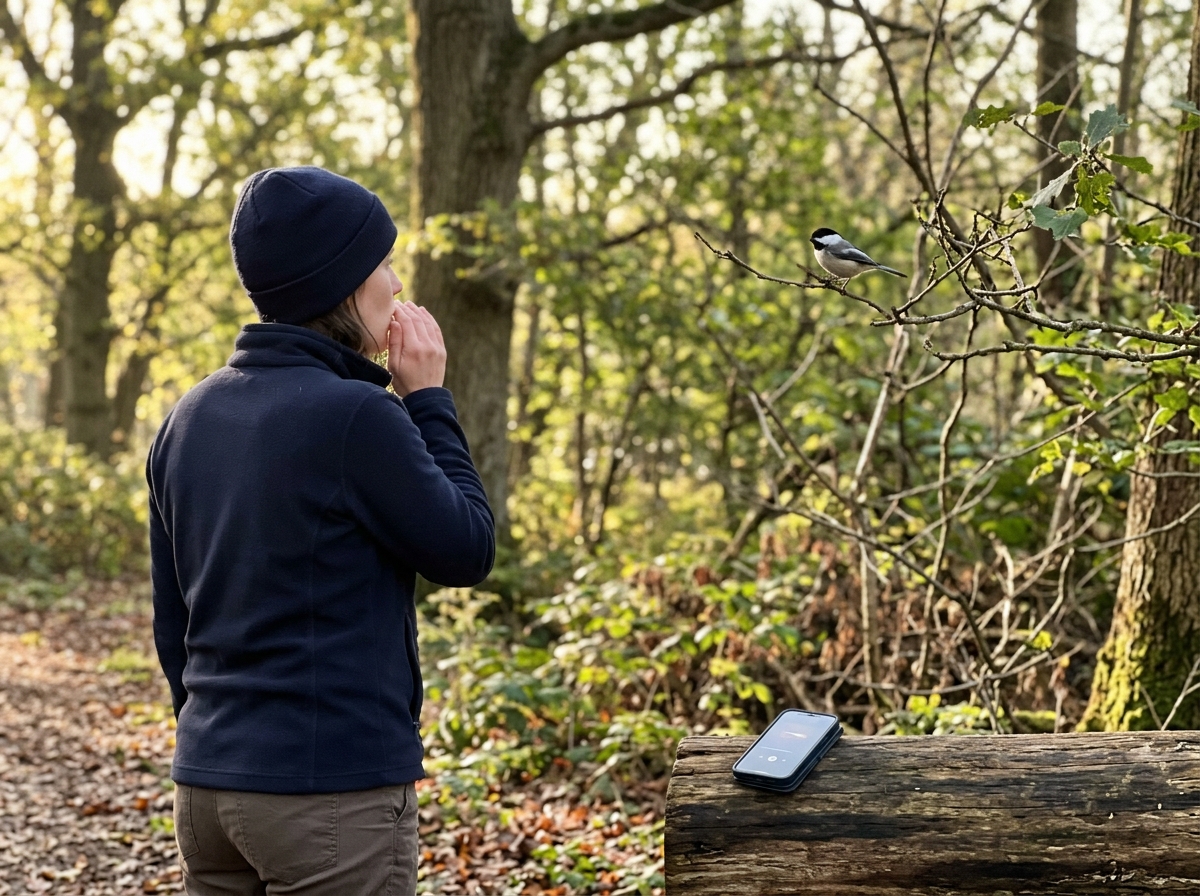
Live listening is where you test what you have learned and train your ear on real variation. Real birds do not sound identical to the reference recording every single time. Individual birds vary slightly, calls differ by season and context, and background noise changes everything. Going outdoors and identifying a call you already know builds the kind of flexible recognition that recordings alone cannot teach.
One important note on playback in the field: playing bird call recordings loudly in a natural area to attract birds is something most conservation organizations specifically advise against. It can disrupt feeding, nesting, and territorial behavior. If you use a recording outdoors as a reference while you are learning to imitate a call yourself, keep the volume low and keep sessions brief. The goal is to train your ear and voice, not to broadcast audio into a habitat.
The best workflow is to build your call at home with recordings until it is consistent, then take it outside and listen for the real bird. When you hear it, you already know what to match. That live comparison, where you whistle your version and hear the real thing nearby, is the fastest calibration available to a beginner and far more rewarding than any app drill.
FAQ
If I pick the wrong beginner call, how can I tell quickly and what should I do next?
Yes. If you cannot match the call exactly on the first day, start by aiming for the correct rhythm and the relative pitch direction (second note lower or higher than the first). Once you can place the two notes in the right order and timing, then refine the exact pitch with short, isolated repeats.
When my recording sounds close but not right, what should I check first, pitch or timing?
Practice the call in short loops at a comfortable volume, then do one “control rep” right before you record. When you play the recording back, judge the gap between notes first, then pitch. If the gap is off, do not keep grinding pitch, go back to isolating the pause and re-matching it.
Why do my notes drift even when I feel like I am copying the recording?
Some people whistle without keeping the exact same mouth shape. To stabilize it, repeat the call with the same “starting posture” every time, then only adjust airflow slightly. If you notice the pitch jumps randomly, your mouth shape or tongue position is changing between reps, not just your breath.
How do I progress if I can do the chickadee but I get stuck when adding complexity?
Use a call you can hear clearly, then build a “version ladder.” For example, step 1 gets the two-note whistle correct with a steady pause, step 2 makes the loudness arc match (clean attack, steady middle, smooth release). Only add a third note after your two-note version is identifiable by someone else.
What should I do if my call improves indoors but falls apart outside?
If you sound fine when alone but worse in wind or with background noise, reduce the challenge rather than forcing volume. Use a quieter practice spot for the next drill, or use headphones to keep the reference consistent. Outdoors, focus on matching the overall shape and rhythm first, then tune pitch once the environment is calmer.
Do real birds sound exactly like the audio recordings, or should I expect differences?
Do not aim to perfectly “copy every variation” from the start. Instead, learn the core phrase structure, then accept that real birds may shorten the pause or slightly shift pitch by context. Your goal is recognition, not identical sound every time.
How do I use a waveform or spectrogram when I do not have perfect pitch yet?
A spectrogram helps most when you measure the gap. Pause the audio at the start of the first note, then count the blank space duration until the second note begins. Practice matching that gap first, then check whether the second note’s pitch is higher or lower than the original.
Is it better to compare against the original every time, or can I rely on my memory between reps?
Yes, but keep it as a feedback tool, not your sole source. Record yourself at the same distance and volume each session, compare immediately to the original, and then switch back to live listening. This prevents you from training only to your own playback characteristics.
How can I fix the problem of being too loud or too soft when I practice?
If your call is consistently too loud, you are likely over-projecting airflow. Go back to conversational volume, then build intensity only after the rhythm locks. If you are too quiet, slightly increase airflow while keeping the same mouth shape, then re-check the note connection and the pause.
What is the fastest troubleshooting method when my full two-note call sounds wrong?
If your full attempt sounds wrong and you cannot identify why, return to the smallest verified unit. Start with the first note alone for several reps, then the second note alone, then just the transition between them. This usually reveals which note or connection is off within a minute.
How can I validate that my call is actually recognizable and not just “close”?
You can practice without sharing it with others, but self-testing improves fast if you do one blind check. Record your call, play it to a friend who can identify birds or use a bird ID app for recognition, then iterate based on whether the two-note pattern is recognized.
Is it okay to use bird call recordings outdoors while learning?
If you use playback for reference while learning, keep volume low and sessions brief, and use it mainly for home calibration rather than repeated long outdoor broadcasts. The safer beginner approach is to listen for the real bird outdoors instead of driving birds with recordings.
Next Article
How to Bird Whistle: Techniques and Simple DIY Tools
Step-by-step how to bird whistle with mouth and airflow tips, plus DIY bird-whistle toy building and tuning for real chi